数据持久化
文件的保存和读取
Json文件:每个乐谱页对应一个Json文件。文件保存乐谱每小节的大小和位置信息,以及乐谱的基本信息,包括每小节节拍数和用户设置的速度和Mask偏移量。
png文件:每个乐谱都有一个乐谱图片,如果用户做了笔记,还有一个笔记图片。
保存文件的代码如下:
1
2
3
4
5
6
7
8
9
10
11
12
13
14
15
16
17
18
19
20
21
22
23
24
25
26
func getRootPath() -> String? {
    return NSSearchPathForDirectoriesInDomains(.documentDirectory, .userDomainMask, true).first
}

func saveImageFile() {
    if let rootPath = Utility.getRootPath(),
        let imageName = getFileName() {
        let imagePath = "\(rootPath)/\(imageName).png"
        print("image path: \(imagePath)")
        if let image = imageView.image, let imageData = image.pngData() {
            FileManager.default.createFile(atPath: imagePath, contents: imageData, attributes: nil)
        }
    }
}

func saveJsonFile() {
    if let rootPath = Utility.getRootPath(),
        let jsonFileName = getFileName() {
        let jsonPath = "\(rootPath)/\(jsonFileName).json"
        print("image path: \(jsonPath)")
        let jsonDic: [String: Any] = [basicInfoKey: [String: String](), barFramesKey: barFrames]
        if let jsonData = try? NSKeyedArchiver.archivedData(withRootObject: jsonDic, requiringSecureCoding: false) {
            FileManager.default.createFile(atPath: jsonPath, contents: jsonData, attributes: nil)
        }
    }
}
读取文件的代码如下:
1
2
3
4
5
6
7
8
9
10
11
12
13
14
15
16
17
18
19
20
21
22
23
func loadJsonFile() {
    if let rootPath = Utility.getRootPath(),
        let jsonName = navigationItem.title,
        let jsonData = FileManager.default.contents(atPath: "\(rootPath)/\(jsonName).json"),
        let jsonObjectAny = NSKeyedUnarchiver.unarchiveObject(with: jsonData),
        let jsonObject = jsonObjectAny as? [String: Any] {
        if let sheetBasicInfo = jsonObject[basicInfoKey] as? [String: String] {
            self.sheetBasicInfo = sheetBasicInfo
        }
        if let barFrames = jsonObject[barFramesKey] as? [Int: CGRect] {
            self.barFrames =  barFrames
        }
    }
}

func loadSheetImage(with imageName: String) {
    if let rootPath = Utility.getRootPath(),
        let sheetImage = UIImage(contentsOfFile: "\(rootPath)/\(imageName).png") {
        sheetImageView.image = sheetImage
        noteImageView.image = UIImage(contentsOfFile: "\(rootPath)/\(imageName)\(noteImageSubfix).png")
        layoutImageView()
    }
}
NSDefault:保存标签信息
1
2
UserDefaults.standard.setValue(allTags, forKey: allTagsKey)
let allTags = UserDefaults.standard.value(forKey: allTagsKey)
参考
播放节拍器声音
通过AVFoundation播放声音
1
2
3
4
if let audioUrl = Bundle.main.url(forResource: "FirstMeter", withExtension: "wav", subdirectory: "Resource.bundle")  {
    AudioServicesCreateSystemSoundID(audioUrl as CFURL, &firstMeterId)
}
AudioServicesPlaySystemSound(self.firstMeterId)
节拍器音量调节
在设置中,如果“声音->铃声和警报”下面的“跟随按钮”没有打开,那么通过AudioServicesPlaySystemSound()播放的声音就会始终用一个固定的音量播放,其它声音API播放的声音(比如AVAudioPlayer)会跟随系统音量变化音量大小。
In Settings app, Sounds->RINGER AND ALERTS, if ‘Change with Buttons’ is set to Off, then sounds using AudioServicesPlaySystemSound() will always be played at a fixed volume (yet other sound API’s such as AVAudioPlayer will respect the volume of the device).
navigationController的使用和数据的传递
通过下面两种方法进行ViewController的弹出
1
2
3
let playVC = storyBoard.instantiateViewController(identifier: "Play")
playVC.navigationItem.title = filtedFileNames[indexPath.row]
navigationController?.pushViewController(playVC, animated: true)
或者
1
2
3
4
let colorPickerVC = UIColorPickerViewController()
colorPickerVC.selectedColor = brushColorButton.selectedColor
colorPickerVC.delegate = self
present(colorPickerVC, animated: true, completion: nil)
通过delegate进行目标ViewController到源ViewController的方法调用和数据传递,源ViewControler可以直接设置目标ViewController的属性进行数据传递。
参考
PhotoKit的使用
需要在info.plist里面设置NSPhotoLibraryUsageDescription属性,设置在获取权限的时候显示给用户的弹窗中显示的内容。
检查权限状态:
1
2
3
4
5
6
7
8
9
10
11
12
13
14
15
16
17
private func requestPrivilegeAndLoadPhotos() {
    let status = PHPhotoLibrary.authorizationStatus()
    if status == .authorized {
        loadPhotos()
    } else {
        PHPhotoLibrary.requestAuthorization { (status) in
            if status == .authorized {
                self.loadPhotos()
                DispatchQueue.main.async {
                    self.collection.reloadData()
                }
            } else {
                // use not grant the privilege
            }
        }
    }
}
如果用户给了访问相册的权限,通过下面的方法加载所有图片信息:
1
2
3
4
5
private func loadPhotos() {
    let allPhotosOptions = PHFetchOptions()
    allPhotosOptions.sortDescriptors = [NSSortDescriptor(key: "creationDate", ascending: true)]
    allPhotos = PHAsset.fetchAssets(with: .image, options: allPhotosOptions)
}
通过下面方法将所有图片信息显示在collection列表中:
1
2
3
4
5
6
7
8
9
10
11
12
13
14
15
16
17
18
func collectionView(_ collectionView: UICollectionView, numberOfItemsInSection section: Int) -> Int {
    return allPhotos.count
}

func collectionView(_ collectionView: UICollectionView, cellForItemAt indexPath: IndexPath) -> UICollectionViewCell {
    if let cell = collection.dequeueReusableCell(withReuseIdentifier: cellIdentifier, for: indexPath) as? PhotoCollectionCell {
        let assert = allPhotos.object(at: indexPath.item)
        PHImageManager.default().requestImage(for: assert, targetSize: CGSize(width: photoCollectionWH, height: photoCollectionWH), contentMode: .aspectFill, options: .none) { (image, dic) in
            if let image = image {
                cell.imageView.image = image
            }
        }

        return cell
    } else {
        return collection.dequeueReusableCell(withReuseIdentifier: cellIdentifier, for: indexPath)
    }
}
通过下面方法,将用户选择的图片传给delegate处理(delegate可以是源ViewController):
1
2
3
4
5
6
7
8
9
func collectionView(_ collectionView: UICollectionView, didSelectItemAt indexPath: IndexPath) {
    print("item: \(indexPath.item)")
    let assert = allPhotos.object(at: indexPath.item)
    PHImageManager.default().requestImage(for: assert, targetSize: CGSize(width: assert.pixelWidth, height: assert.pixelHeight), contentMode: .aspectFill, options: .none) { (image, dic) in
        if let image = image {
            self.delegate?.set(image: image, and: nil)
        }
    }
}
参考
Alert View
Displaying Alerts with UIAlertController in Swift
UIImage
下面两个图片加载方法对cache的运用是不一样的:
1
2
+ (UIImage *)imageNamed:(NSString *)name: use cached images
+ (UIImage *)imageWithContentsOfFile:(NSString *)path: skip cached images and read data directly from file
参考
iOS UIImage Cache
可编辑的UITableView
通过实现下面方法保证每个cell支持左滑操作:
1
2
3
func tableView(_ tableView: UITableView, canEditRowAt indexPath: IndexPath) -> Bool {
    return true
}
通过实现下面的方法,左滑之后显示两个按钮: Edit Tags和Delete
1
2
3
4
5
6
7
8
9
10
11
12
func tableView(_ tableView: UITableView, editActionsForRowAt indexPath: IndexPath) -> [UITableViewRowAction]? {
    let deleteAction = UITableViewRowAction(style: .destructive, title: "Delete") { (action, indexPath) in
        self.deleteItem(at: indexPath)
    }
    let editAction = UITableViewRowAction(style: .default, title: "Edit Tags") { (action, indexPath) in
        self.editTags(for: indexPath)
    }
    editAction.backgroundColor = UIColor(displayP3Red: 60/255, green: 148/255, blue: 1.0, alpha: 1.0)
    deleteAction.backgroundColor = .red

    return [deleteAction, editAction]
}
CALayer & CAShapeLayer & Core Graphics
这一块的内容太多,希望有时间可以单独总结一下。
音乐术语英语
音乐术语英文名称汇总
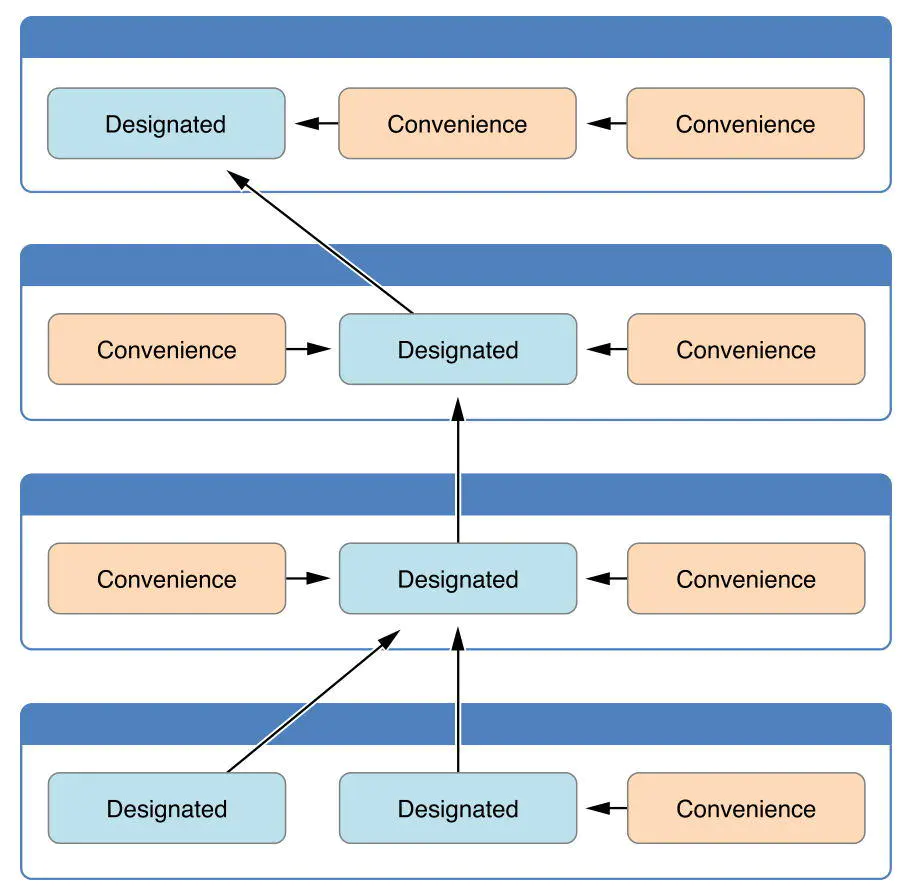
swift中构造方法designated,convenience
官方文档中有如下描述:
子类designated构造方法中必须调用父类的designated构造方法。
convenience构造方法中必须调用当前类的构造方法。
convenience构造方法归根结底要调用到designated构造方法。
参考
笔记绘制功能
通过第三方库STSketchKit 实现笔记功能支持Undo/Redo操作。官方介绍如下:
ATSketchKit is a drawing / sketching framework for iOS written in Swift.
It can be used as the foundation for an artistic app, a simple signature feature or more inteligent graph designing app.