Offline Natural Language Understanding Engine on iOS
Objective

We want an NLU Engine to understand the normal text command on Mobile. We hope the engine can know the command’s intent and the info the command needs to execute.
Currently, there are many NLU related tools, like Google Dialogflow, Amazon Lex, Facebook Wit.ai, Microsoft Luis. However, they are all online tools. Considering the privacy problem, we are trying to build our own offline NLU Engine.
What is a good NLU engine
Let’s start by looking at a simple example, and see what you would expect from a good NLU engine.
First, we need some examples to train the NLU engine. Consider the following dataset, used to train a simple weather assistant with a few query examples:
- Give me the weather for [tomorrow](date)
- Show me the [Paris](location) weather for [Sunday](date)
Deterministic behavior
The first thing you want is that all the examples you give to train the model are correctly supported by the engine. This makes the system predictable and easy to use: if a query is not correctly parsed, then add it to the dataset and it will work right away.
Generalization power
Having this deterministic behavior is great for robustness and predictability, but a powerful NLU engine also needs to have some generalization power. You want the system not only to recognize patterns provided in the training set, but also all the possible variations that come from speaking naturally. If we go back to the previous dataset, it is reasonable to expect the NLU engine to parse a query like: “What’s the weather in Beijing right now?” even though it is not one of the training examples.
Design and Workflow
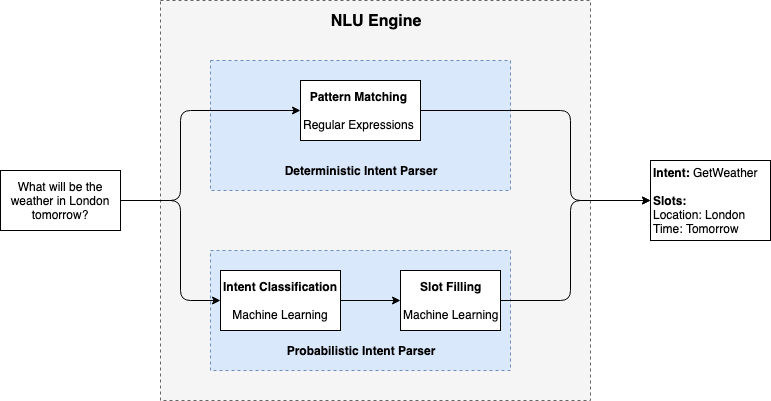
In order to satisfy these objectives: deterministic behavior and generalization power, we built the processing pipeline described in the figure above. It receives a text as input, and outputs a structured response containing the intent and the list of slots. The main processing unit of the pipeline is the NLU engine. It contains two intent parsers which are called successively: a deterministic intent parser and a probabilistic one.
The deterministic parser relies on regular expressions to match intent and slots, which results in perfect behavior on training examples but doesn’t generalize. This parser is the first to be used because of its strictness.
The probabilistic parser is used whenever the first parser fails to find a match. It uses machine learning to generalize beyond the set of sentences seen at train time, thus making our NLU engine be able to cope with examples which are not in the scope of the training data set. This parser involves two successive steps: intent classification and slot filling. These two steps rely on trained machine learning models to classify intent and extract slots.
Deterministic Intent Parser
The Deterministic Intent Parse is the first step to be used. This parser relies on some regular expressions to match the intent and slots. If the new input has the same structure with one of the training examples, we will find its intent and slots by comparing the input with the matched regular expression.
The regular expressions are built based on the training examples. For a training case:
- What is the weather in [Alaska](location)
We will build a regular expression:
- (what is the weather in)(?<location1>.+)
Probabilistic Intent Parser
If the Deterministic Intent Parser fails to find the intent and slots, the Probabilistic Intent Parser will be used.
The Probabilistic Intent Parser has two steps:
- Intent Classification
- Slot Filling
The Intent Classification is to find the intent of the input command text, and the Slot Filling is to extract all the slots needed by the intent. These two steps are both based on trained machine models.
Apple has released CreateML for training natural language models, which also integrates the powerful NatrualLanguage framework functions, like Tokenization, Part of Speech, Lemmatization, Name Entity Recognition, etc. This will make the training process very simple, and the trained model will be more accurate and smaller.
Intent Classification
Model Training
For Intent Classification model training, we prepare the data set as follows (The size of the training data is 3282 falling into four intents.):
1 2 3 4 5 6 7 8 9 10 11 12 13 14 15 16 17 18 19 20 21 22 | |
Apple has release CreateML framework for training machine learning models easily inside Swift playground and the trained model can be saved as mlmodel type. And the MLTextClassifier class from CreateML will benefit from Apple’s NatrualLanguage framework for Tokenization, Part of Speech, Lemmatization, etc.
The training script is:
1 2 3 4 5 6 7 8 9 10 11 12 13 14 15 16 17 18 19 20 21 22 23 24 25 26 27 28 29 30 | |
We can get 99.23% training accuracy and 98.87% validation accuracy.
Model Usage
For the trained model of mlmodel type, we can use it in our iOS app through NLModel (from NatrualLanguage framework). The demo swift code may be like:
1 2 3 4 5 6 7 8 | |
How to use .mlmodel file?
.mlmodel file needs to be compiled before using. There are two ways to do this: offline and online:
- offline: drag the mlmodel into your project, xcode will compile the .mlmodel for you before you build you app.
- online: use
MLModel.compileModelto compile your .mlmodel file at runtime. This is especially useful when your are at swift playground, where you cannot get xcode’s help for comipling.
Slot Filling
Model Training
For Slot Filling model training, we prepare the data set as follows (The size of the training data is: 3282.):
1 2 3 4 5 6 7 8 9 10 11 12 | |
Like Intent Classification model training, CreateML framework also makes it easy. Like MLTextClassifier, the MLWordTagger class from CreateML will also benefit from NatrualLanguage framework for Part of Speech, Lemmatization, Name Entity Recognition, etc.
The training script is:
1 2 3 4 5 6 7 8 9 10 11 12 13 14 15 16 17 18 19 20 21 22 23 24 25 26 27 28 29 30 31 | |
We can get 99.64% training accuracy and 98.38% validation accuracy.
Model Usage
We can load the mlmodel into an NLTagger (from NatrualLanguage framework), and use the NLTagger to tag labels for each word of the input command text. The demo swift script is like:
1 2 3 4 5 6 7 8 9 10 11 12 13 14 15 16 | |
Reference
- Creating a Text Classifier Model: Apple offical site for training and using machine learning models through CreateML framework.
- WWDC video Introducing Natural Language Framework: This session introduces NLP framework and its relation with CreateML framework.
Model Size
For the iOS app, we hope the machine learning model size is small enough. Apple’s NatrualLanguage framework has done many optimizations on machine learning model size. The following data is from WWDC 2018 (session 713: Introducing NatrualLanguage Framework):
| – | Open Source CRFSuite | Natural Language Framework |
|---|---|---|
| Name Entity Recognition | 70MB | 1.4MB |
| Chunking | 30MB | 1.8MB |
We can see that the model will be much smaller than that trained from an open source platform.
The size of the two models we trained is (The training data size is: 3282):
| Model | Size |
|---|---|
| Intent Classification | 41K |
| Slot Filling | 609K |
If your model is a neural network, you can reduce the size of your model by the following way: Reducing the Size of Your Core ML App. You can control the precision of the neural network parameters, and thus the size of the trained model.
If still your model is large, you can Downloading and Compiling a Model on the User’s Device at runtime.
Problems to Be Solved
For Probabilistic Intent Parser, we still have some problems.
Intent Classification Model Has No Probability Output
We may need the probability to define the reliability of the estimated intent of an input command text.
However, the model trained through MLTextClassifier has no probability output API. If we really need the probability output, we can use other platforms to train the model, like tensorflow. That way, we will not benefit from NatrualLanguage framework and we need to consider these things by ourselves, like Tokenization, Part of Speech, Lemmatization, etc.
Try other tools for training models with probability output, like Turi.
Slot Filling Model Tagges the Label by Words, not Phrase
The NLTagger class only supply the following four tag level: word, sentence, paragraph, and document. There is no “phrase” tag level. For example, “New York” will be treated as “New” and “York”, and the tagged label will both be “location”. We need to compose them together manually.